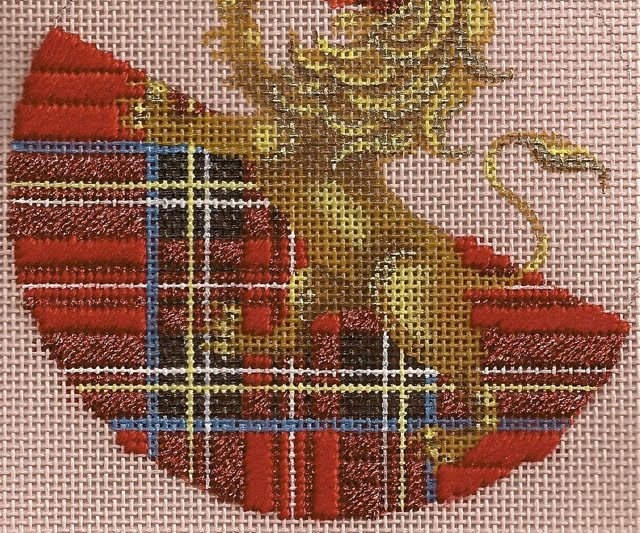
I know at least one reader is interested in stitching plaids in more than just tent stitch. If you look carefully at yesterday's photo in close up above, you'll see that the largest bright red areas are broken up into smaller sections, each stitched as a separate rectangle. I thought that would look better than a smooth filling of the large shape with laid slanted stitches. I want the plaid to have dimension and I'm doing this with texture (using silk/wool blends and metallics) and also with different stitches.
Today I am adding a new thread called Sullivans Embroidery Floss (well, it is new to me) that a friend sent. She'd heard good and bad things about it so she got some samples for me to use. One color happened to be a royal blue, suitable for the Stuart Plaid. So I used it. Sullivans Embroidery Floss is a six stranded cotton floss thread, made in China according to the label. Sullivans is an Australian company with an affiliate in New Zealand. They do tapestry wool and a lot of sewing notions, too. The royal blue color I have is #796 and it seems to be a pretty close color match to DMC's #796. Sullivans says right on the label that this skein is "similar to DMC #796."
I had a little trouble stripping the Sullivans floss into the six plies. I cut my usual 18 inch length and it did knot itself together as I tried to separate the plies. It seems to be important to hold all the plies in one hand and pull hard on the one you want to separate with the other. The individual plies seem a bit thinner and a little shinier than DMC cotton floss plies. Otherwise, I can't tell much difference. The Sullivans stitches up just fine. Since no one here carries Sullivans, I probably will just use the colors my friend sent and not try to mail order but I'd bet that folks in Australia where it is based use Sullivans all the time. If anyone else has experience stitching with this thread, we'll all love you to post about it in the comments. For everyone else, here is the Sullivans American website's page about their embroidery floss.
http://www.sullivans.net/usa/sullivansfloss/
Back to the stitching!

Using four plies of my Sullivans, I stitched the bright blue areas in Cashmere Stitch, mostly laid out horizontally. Here is a diagram but the stitches here are oriented vertically.
http://needlepoint.about.com/od/texturedstitches/ss/StraightCashmere_3.htm
It is pretty easy stitching. There are a few areas where the cashmere stitches need to be a bit longer or shorter, or where a tent stitch or two is needed around a leg, but it is straightforward. As you can see, I extended one of the blue stripes up into the upper half of the ornament and started to fade it out, stitching with spaces between two cashmere stitches, or just doing some of the stitches that make up a cashmere stitch block. This fading technique is one Marnie Ritter uses a lot and I admire it greatly. I thought it would continue the plaid up into the top background without dominating the area.
I've also started working the white lines in the plaid. You may not be able to tell from the photo, but some of the white lines are light grey where the line crosses the black plaid areas. I decided rather than stitching some as white and some as grey, I would stitch all of these lines in silver, using my new Kreinik holographic thread. I've done two vertical lines, laying long lines of thread on either side of the thread painted white (or grey). You can see this on the right hand line that is stitched. My vertical threads actually lie in the "ditches" on either side of the painted line. I used Kreinik holographic 001L in #8 braid for this.
The left hand stitched line is tidied up by couching over the two underlying silver holographic threads with Kreinik holographic 001L in 1/16 inch ribbon. The 1/16" ribbon is shinier than the #8 braid and couching the underlying thread makes for a tidier and brighter line.
This is just another way of dealing with a single line in a plaid. I think it will look nice once I finish. Some of the silver lines will also end up in the upper background. But you'll have to wait and see what things look like until I can finish the silver stitching tonight (hopefully).
Written by Jane/Chilly Hollow
Blogging at http://chillyhollownp.blogspot.com
Archived Yahoo 360 postings at http://profiles.yahoo.com/chillyhollow
