I recently discovered that Julia Snyder has a website! You may have noticed her books which she has just started to publish. I have her Backgrounds & Such and have enjoyed reading it a lot. I got the idea for the stitch I used on the large dog on my Cape Cod Dogs canvas from this book. Julia is primarily a teacher so don't miss the photos of classes she offers. I recommend you click on Play Slideshow as those photos seem a bit better.
http://www.havestitchwilltravel.com/
Today's blog reader mentioned that the newest ThreadworX Journal is almost ready for release. It's going to be all about YELLOW.
http://threadworx.typepad.com/the-needleworx-journal/2010/06/the-yellow-issue-releases-this-week.html
If you haven't signed up for the ThreadworX quarterly e-newsletter yet, head over to their website and click on the upper right hand corner link. You don't want to miss this fabulous free resource.
http://www.threadworx.com/
Written by Jane/Chilly Hollow Blogging at http://chillyhollownp.blogspot.com Archived Yahoo 360 postings at http://profiles.yahoo.com/chillyhollow
Wednesday, June 30, 2010
Jane's Leafy Adventure, Part One
Labels:
brazil series,
cha-cha,
Leigh
 |
| Cha Unstitched |
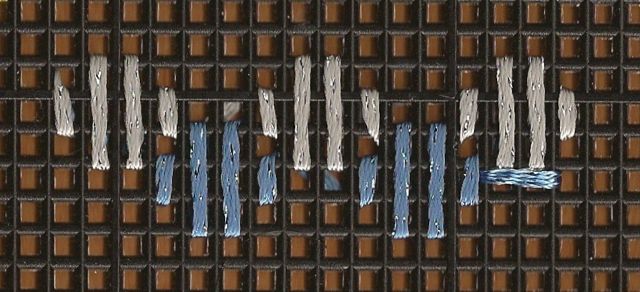
I have been stitching leaves for nearly a week now.
If you look at the photo of the unstitched canvas above, you will see the variety of leaves on this piece. There are ten leaves on Cha, most of which have the same thick toffee brown vein down the middle. However, two rounded small leaves have a light green thin vein and a pointed larger leaf also has the same vein treatment.
I had to decide what shades of green to use, what stitches and whether all the leaves were to be stitched the same way. Eventually, as I discussed in the Let's Talk Green posting on June 25, I choose to use three shades of green. Very dark green is used only in the centers of the magnolia flowers. Medium green and an overdye yellow-green are my leaf colors. Since I choose light coverage stitching for the leaves and am just using one ply of my floss-type threads there, I can limit the number of colors I use. The shading of the leaves will show through the stitches and enhance and shade the thread colors I use.
I finally decided to group the 10 leaves into three groups which are the two small rounded leaves next to the partial flower; the leaves under the fruit cluster plus all the leaves near the large flower; except for the pointed leaf with the light green vein. That leaf is the third type and is in a group by itself.
Today I'm going to talk about the two small round leaves near the partial flower. They are small and should recede so I decided to use the same small-scale round stitch I used on the peach and plum (see the June 27 blog posting for details). I treated the two leaves as one unit and continued the stitch from one leaf in a row into the next instead of working each separately as I did the flower petals. Note that the stitch was done in horizontal rows with the canvas held upright. I used only the medium green Splendor (one ply) for these leaves as the bulk of the color is medium green. Once the two leaves were stitched, I used my yellow-green overdye to stem stitch the veins right on top of my first layer of stitches. I didn't even have to refer to my color copy of the canvas as I could see the veins through my stitches.
 |
| Three Veins Stitched |
Written by Jane/Chilly Hollow Blogging at http://chillyhollownp.blogspot.com Archived Yahoo 360 postings at http://profiles.yahoo.com/chillyhollow
Tuesday, June 29, 2010
Shop News
Labels:
Exclamation Point,
Needle in a Haystack,
Needleworks,
shop news,
shops,
videos

It must be something in the air because two of my favorite shops are moving in July.
Needle in a Haystack in Alameda, CA is moving to slightly smaller digs with better parking. Here are the details. Click on "Our Move Week Is July 12" to read even more as exact moving day plans are made.
http://needlestack.typepad.com/whats_new/2010/06/were-moving-in-july.html
Needle Works in Austin is moving right now. They hope to reopen at the new location July 1st. The second link is to their June newsletter which has photos of the new interior and a map for visitors.
http://www.theneedleworks.com/
http://www.theneedleworks.com/newsletter/201006newsletter.pdf
Good luck on the move! I'm sure it'll turn out as well as Exclamation Point's new revamped website did. They have two great videos now, one on the home page and one on the Canvases page. Fun to watch and I'm told this is a very very nice shop to visit if you are ever in Saratoga, CA.
http://exclamationpoint.org/
Written by Jane/Chilly Hollow Blogging at http://chillyhollownp.blogspot.com Archived Yahoo 360 postings at http://profiles.yahoo.com/chillyhollow
Cha's Wild Grapes and Seed Pod
Labels:
brazil series,
cha-cha,
Leigh

The last two pieces of fruit the parrot is eating are the cluster of wild grapes and the seed pod they rest on. I decided to completely bead the grape area using Sundance's size 14 clear hex beads and the three shades of purple from the plum. I also used a bit of white thread to attach beads in the grape highlights. It seemed to take forever and the beads look more like sequins than grapes but I like the look.
The next thing to tackle was the seed pod. It gave me a lot more trouble than I expected. The pod is painted silver-gray and blue-gray--matching those colors was harder than I expected. I started with two silk flosses and satin stitches that I padded but I didn't really care for the look or the colors. So out it came and I tried simple straight stitches using my silks. Didn't like that either. I rummaged around in my stash a bit more and found two spools of Trebizond silk that seemed to match the painted colors very well and two skeins of silk/wool Impressions that weren't as good a match but which seemed to have the right rough texture for a seed pod if I used something along the line of interlocking Gobelin.
Here's a nice diagram on the About.com site about interlocking Gobelin.
http://needlepoint.about.com/od/longstitches/ss/EncroachInterlockGobelin_2.htm

I've always used interlocking Gobelin for animal fur, never for plants, so I wasn't sure how this would work. I've always used rough threads for this stitch as well, which is reasonable for a fur look. But some imp prompted me to try the Trebizond in this stitch because the colors matched the paint so well. Above you can see me starting the tip of the pod and the first row of the full pod length.
 |
| Cha's Cluster of Fruit Finished |
Sunday night I stitched 2 1/2 more leaves and most of the leaf veins, leaving me 2 1/2 leaves to go before I have to start working background again.
Written by Jane/Chilly Hollow Blogging at http://chillyhollownp.blogspot.com Archived Yahoo 360 postings at http://profiles.yahoo.com/chillyhollow
Monday, June 28, 2010
Canvas of the Month: Bonnie's Mermaids on the Beach
Labels:
Bonnie,
canvas of the month,
Devon,
JB Designs

This month's canvas is a JB Designs piece from Devon. I don't know the dimensions or the canvas count but I suppose it is a 5x5 piece, probably on 18 count.
It screams summer to me and looks like a very fun and easy stitch. Hope you like it!
Bonnie's Version:
What a fun little piece that would make a great summertime reminder for any age girl!
I would start with the mermaids using lots of silk so there would be a slight shimmer that looked like they just came from the water! Starting with the body and the face, I would use a strandable silk in a simple tent stitch for all including the face features. I would stitch right over the necklace on the one girl and add it back on top later using pearl like beads. I would do the tail in either a diamond ray using strandable silk with Accentuate added or maybe the smaller size silk lame braid (but that might be too thick). Another stitch that would be fun would be the mock buttonhole eyelet stitch from Amy’s Cookbook – Chapter 11. You could add extra sparkle if you did used that stitch by making the wrapped part of the stitch with a Kreinik braid. Lastly, to complete the mermaids, you have the hair. Again I would use a strandable silk probably just in a random long/short stitch. To add curls to one of them you could also do bullion knots.
The rock that the mermaids are sitting on would be next. Personally I hate coming up with stitches for rocks. I have yet to find the perfect stitch or fiber! So on this one since its large, I would try an overdyed cotton floss – something with just subtle color changes and when I separated the plies I would reverse some of the strands so the rock would have slight color variations, but wouldn’t end up striped! Another possibility would be a wool which would look a little more rough. Stitches to try would be a staggered cross (mix of larger and smaller cross stitches in a regular pattern) or a checkered cross. Again both stitches are in Amy’s Cookbook – chapter 21.
The best treatment I have found for sand is to do a skip tent stitch and then fill in the skipped spaces with single wrap French knots. I know that makes a lot of French knots, but the effect is really worth it! I would use either floss or an overdyed floss, again with the strands reversed so you don’t get striped sand.
For the water, I would do a swirl stitch stitched horizontally so it would look like waves in an overdyed cotton floss with Accentuate added in a few rows where the sun would sparkle off the water or maybe just closer to shore. Using the overdyed would allow you to ignore the shading on the canvas and use the shading in the floss instead. If you couldn’t find an overdye with the right colors pick 2-3 solids and use them instead, but don’t break up the stitches in the swirl stitch to get the color changes, switch colors when you can with full stitches. For the sky, a random horizontal satin stitch would work well with two strands or so of a floss. I am thinking a lighter coverage stitch so the sky recedes to the background. I wouldn’t worry about the shading in the sky since the coverage would be light – the subtle color changes will show through.
That leaves the star fish, which are the toughest part I think on this canvas. When I visualize a starfish, I see texture, but remember I have French knots in the sand, so I need another type of texture. I would try a small size perle cotton which would give a different texture and sheen. Then I would try to find a tied stitch or something like an upright cross to fit in the space you have. That would add some additional. This is the area where you would have to experiment a bit based on what you ended up using for the sand and the rocks. It may end up since there is such little room on starfish that you would have to just go with a tent stitch and have the perle cotton provide the texture difference.
That’s it for this little canvas. A fun little piece that just wants to make you smile! Happy summer!
Written by Jane/Chilly Hollow Blogging at http://chillyhollownp.blogspot.com Archived Yahoo 360 postings at http://profiles.yahoo.com/chillyhollow
Canvas of the Month: Jane's Mermaids on the Beach
Labels:
canvas of the month,
Devon,
JB Designs,
mermaids
This month's canvas is a JB Designs piece from Devon. I don't know the dimensions or the canvas count but I suppose it is a 5x5 piece, probably on 18 count.
It screams summer to me and looks like a very fun and easy stitch. Hope you like it!
Jane's Version:
I think the two little mermaids tossing starfish back and forth from the shallows to the shore are great fun. The canvas is more complicated than you would think just looking at it, however. There are a lot of parts but because it is small, they shouldn't take long to stitch. I think I'll start with the sky, stitching it in 2-3 shades of pale blue in skip tent. The water is a deeper blue with green mixed in, so I would choose three shades of turquoise floss and work it in horizontal random stitches that zigzag down from the upper left corner of the water towards the sandy beach. Use 2-3 plies, just enough to barely cover the painted canvas. In a few places where you want highlights, use a white Accentuate to restitch a few long stitches on top of the floss.
The sandy beach should be stitched with 3 shades of sandy brown. I think I'd use Burmilana in tent stitches and see if any of the heathered colors this thread comes in match roughly the canvas colors. That will give you a mix of colors without having to change threads a lot. Occasionally skip a tent stitch. When the sand is all finished, go back and attach beads where you skipped a stitch. Use either a pale tan or a crystal bead, depending on what you can find locally. Sand on a beach is smooth but it sparkles, so tent stitches with a few beads will look nice and also will look good in contrast with the busy stitch used for the water and the very faint skip tent stitches in the sky. If you can't find the right color in beads, add a few cross stitches instead, using a sandy colored metallic, preferably a small one so you don't make too raised a stitch in the skipped spots.
For the rocks, choose a rough thread like a thin wool or perhaps a linen thread in two shades of gray. Work the rock in a rough stitch like Nobuko stitch.
Now it is time to stitch the starfish. I'd choose something shiny like Flair or one of the nylon threads like Panache in two shades of gold. Work the perimeter of the starfish in tent stitches. (You may have to use a reverse tent stitch occasionally to make sure the points of the starfish are true.) The center can be gold beads (use two shades of gold if you can find them), or tiny French knots (using two or three shades of gold thread). You can also add a strand of Accentuate to the needle when doing your French knots to give a little something extra to the starfishes' bumpy centers if you aren't using a metallic thread there. Perhaps you would like to use only a metallic thread like Kreinik (still in two shades of gold) to the starfish the girls are tossing? It is the focal point of the canvas, after all. The colors of the French knots and whether they have a touch of metallic or are all metallic is up to you.
The little mermaids' skin, arms, face and bodies should be tent stitched, using silk or cotton floss. If you are tired of tent stitch, try using a small brick stitch (over two threads) for the skin but tent stitch the features. Do the left mermaid's necklace in gold metallic using cross stitches. The hair is easy. Use stem stitches in brown cotton floss. Once you add in the stem stitches, go back and add a few more here and there on top in a slightly lighter shade for the mermaid on the left and in a slightly darker shade for the mermaid on the right so that they have similar but not identical hair. You might also add a few short, straight stitches at the part of the left mermaid's hair or at the side of the right mermaid's face to show stray strands blowing in the sea breeze.
The mermaid tails are the last part of the design. Use two shades of pink or blue in silk to tent stitch the tails, then use ray stitch on top of the tent stitches, working from the waist down towards the tail. If you use just 2-3 plies of the silk in the ray stitches, the underlaying stitching will show and add a bit more dimension. Once you are done, attach a few pink and blue beads (or a clear bead using either pink or blue thread) on top of the ray stitches. You might also put a few back stitches on top of the tail's tent stitches to show the spines.
This would make a lovely framed piece for a summer cottage or a small girl's room. It would also look lovely in the top of a wooden box. Some lucky little girl would love to keep her treasures in such a box!
Written by Jane/Chilly Hollow Blogging at http://chillyhollownp.blogspot.com Archived Yahoo 360 postings at http://profiles.yahoo.com/chillyhollow
Sunday, June 27, 2010
Rearranging the Furniture Again
Labels:
blog
I'm sure some of you were very surprised to see Blog this morning as I moved the furniture around again. I've discovered that the new look I created a couple of weeks back plays havoc on older computers. Since Blog isn't ALL about me, I decided it would be better to return to the old look as much as possible, even if that means I have to discard some new features. After all, I want folks to be able to visit without the images and text jumping around all over the screen!
So this morning I recreated the old blog look as closely as possible (it is no longer one of the regular templates one can choose from), then changed things all around as much as possible to put them back to where they were before since all the sections were scrambled when I went back to the old template.
The next step is to tinker with the colors of the titles and links before and after you click, etc.
So if you are here during the renovation, sorry! I'll get it all done as quickly as possible. By the way, there are six fish in the koi pond now. There's an extra purple one, just for you guys.
Written by Jane/Chilly Hollow Blogging at http://chillyhollownp.blogspot.com Archived Yahoo 360 postings at http://profiles.yahoo.com/chillyhollow
Trim and Other New Things
Labels:
stitch guides,
trim
I updated the Stitch Guides blog with a brief article on Orna Willis, who is just starting to design painted canvases with a stitch guide, and with a description of Pegge Hopper's Hawaiian women series, some of which come with stitch guides. (One of Pegge's pieces for Needlepoint Etc. in Honolulu is the Canvas of the Day today.) You can visit Stitch Guides by clicking on the tab above, by clicking on the Magic Carpet photo near the blog list on this page, or by going here.
http://chstitchguides.blogspot.com/
Mary Corbet's blog mentioned a brand new product yesterday, a corded metallic trim called Soft Metallic Twist. She has great close up photos of the colors available.
http://www.needlenthread.com/2010/06/soft-metallic-twist-trim.html/comment-page-1#comment-37988
Because Mary doesn't say how much trim is in a package and I can't see the manufacturer name in her photo, I did a little Googling and found that Alex Parras Needle Arts sells this stuff. It comes in two diameters and there is a meter in each package, i.e., roughly a yard.
http://store.apneedlearts.com/mesotwco1me.html
You can buy it in larger quantities here from this Canadian site. At least I think this is the same thing. I know nothing about the Canadian shop, but Alex Parras Needle Arts is the Internet presence of Thistle Needleworks in Connecticut. I highly recommend their shop's selection of goods and their customer service.
http://www.pandgenterprises.com/metal%20threads.htm
Finally, let's go visit Nimble Needle's blog and see how a customer, faced with a gift canvas with elements she didn't particularly care for, customized it to suit her own tastes. I think it turned out great! If you are in the same boat, why not try similar techniques yourself?
http://thenimbleneedle.blogspot.com/2010/06/curls-and-then-some.html
Jane, standing on the edge of the swimming pool and screaming, "Jump, jump, jump!" to the stitchers standing on the edge wondering if there are sharks. No NP police, no sharks, I promise.
Written by Jane/Chilly Hollow Blogging at http://chillyhollownp.blogspot.com Archived Yahoo 360 postings at http://profiles.yahoo.com/chillyhollow
The Peach and the Plum
Labels:
brazil series,
cha-cha,
Leigh
 |
| The Peach and The Plum |
Once Cha's fruit stems were finished, I started work on the peach and plum. These are beautifully painted and I wanted light coverage stitches to show off the shading. I also wanted to use more round or oval stitches. After all, both fruit are rounded and using similar stitches to the ones on the leaves and flower petals will help unify the various areas of this design.
I decided on Small Balloon Stitch, which I found in Brenda Hart's Favorite Stitches (page 11). Here is what it looks like.
 |
| Brenda Hart's Small Balloon Stitch |
Then I switched to the plum and worked it left to right in the same way, except I used one ply of three shades of purple. In this case the highlight is a light purple color. Did you notice the one blue stitch at the bottom of one Small Balloon Stitch in the stitched sample above? Brenda Hart recommends putting a metallic stitch at the top and bottom of the long pairs of stitches in the center of one complete Small Balloon Stitch. I added these two horizontal stitches using purple Accentuate just in the highlight area. The rest of the plum doesn't have metallic accents.
I doubt you can see the metallic pinks and purples in the peach and plum but in person they add a lot to this piece.
Next time I'll talk about the cluster of wild grapes. By the way, I finished another leaf and a half last night, which means I have five leaves to go. I also stitched a leaf vein, to see if the thread and stitch I'd chosen work. But more about that once I finish explaining the fruit cluster.
Written by Jane/Chilly Hollow Blogging at http://chillyhollownp.blogspot.com Archived Yahoo 360 postings at http://profiles.yahoo.com/chillyhollow
Saturday, June 26, 2010
A Quiet Oasis
Labels:
brazil series,
cha-cha,
Leigh
 |
| Cha-Cha's Tree Branch |
Every embellished painted canvas needs a quiet oasis of calm to rest the eyes. That's the established wisdom, which recommends having areas of tent stitch on each canvas. You know me--I think the rules are meant to be broken--but there is sense in this, particularly for a piece with a great deal going on.
I'm trying to calm down the canvas by using related round or oval stitches on the flowers and leaves but when I first started to think about the cluster of fruit and the tree branch they rest on, I decided that it might be smart to stitch the branch itself all in tent stitches.
So that's what I did, except that I skipped the little clinging vine that twists around the branch. Those areas I did not stitch. Once I finished stitching (three shades of brown, Mandarin Floss for the dark and medium browns and DMC cotton floss for the lightest tan) the branch, I couched Kreinik braid around the branch as the vine.
Then with my leftover tail of Kreinik and some of the leftover darkest brown, I also stitched the peach stem. The Kreinik make padding in a sort of backwards 7 shape, which I covered in smooth stitches using the brown floss. If you enlarge the photo you probably can see the backwards 7. In this photo I haven't covered the metallic padding with brown floss yet.
Then I stitched the plum's stem in tent stitches with some leftover black floss.
Once the branch and the fruit stems were finished, I'd laid the foundation for the more embellished grapes, plum and peach. More on that next time.
I stitched the two smallest leaves last night and finished half of another of the large leaves. Six more leaves to go!
Written by Jane/Chilly Hollow Blogging at http://chillyhollownp.blogspot.com Archived Yahoo 360 postings at http://profiles.yahoo.com/chillyhollow
Friday, June 25, 2010
Let's Talk Green
Labels:
brazil series,
cha-cha,
Leigh


.jpg)
The answer is two--I used the Needle Necessities acid green overdye on the yellow-green areas and the darker medium green Splendor that is immediately to the right of the skein of NN.
The acid green card of Splendor would have worked but I liked how the mix of colors in the Needle Necessities overdye looked with the leaf, so I went with shades of green instead of just one green.
I plan to use just three shades of green on this piece instead of matching the five shades of how it is painted. With light coverage stitches, the background mixes with the thread to influence what the eye sees. This may not work well, so I'm not putting the excess green threads away just yet, but I think if I just use the lighter of the two dark greens (also to the right of the skein of NN), I will have enough color to stitch all the leaves.
The next challenge is to decide how to handle the brown vein. Do I continue my stitches on top of the brown vein? Do I then put thread on top of that or just stitch the veins later? How does it look to change colors in the middle of the stitch sequence? Will the stitches flow better if each stitch is done completely in one color instead of breaking it up to match the paint underneath as I did above?
I'll think about all these things today in the sunlight. We lost power twice again last night so although I did get some stitching done, I didn't have enough good lighting to look at what I did and see how it looks. For now I think that any stitch that is interrupted by a vein looks ok but I don't like splitting a stitch between two colors. I may be pulling that out after I look at the canvas from a distance. What bothers you from a foot away as you stitch may not matter from 3-5 feet away, which is generally the distance from which finished pieces are viewed.

See what I mean?
So how did I pick those three colors out of all the possibilities? What I do is just lay a strand of each across the leaf and see how well they harmonize with the colors painted on. Strangely enough, when you are picking colors for a light coverage area, the thread that is an exact match to the paint doesn't ever look quite as good to me as one that is slightly lighter or darker. Somehow the interaction between paint and thread that isn't quite a perfect match adds to the design.
Tomorrow I'll start talking about the fruit clustered below the parrot. I've finished those areas and will describe what I did and why while I stitch more leaves and background.
Written by Jane/Chilly Hollow Blogging at http://chillyhollownp.blogspot.com Archived Yahoo 360 postings at http://profiles.yahoo.com/chillyhollow
Thursday, June 24, 2010
Hot Times and Hot Topics
Labels:
brazil series,
cha-cha,
Leigh
 |
| Cha-Cha's cluster of fruit |
It is HOT here in CH. We lost power twice yesterday, leaving us panting in the 95 degree heat (with a heat index over 100). I didn't stitch much, but I did think quite a bit about the cluster of fruit on Cha. I'm going to do things a bit backwards from what I usually do and show you the photo of an area I've finished, then later explain how each segment was stitched. What you see above is the cluster of fruit near the center of the canvas.
The plum and peach are stitched with light coverage stitches. The wild grapes are entirely beaded. The seed pod is done with full coverage stitches, as are the fruit stems and the tree branch that the fruit rests on.
Using so many beads to completely cover a section of my canvas is equivalent to putting a big hairy tarantula on top of a cupcake--you can't help noticing it. In fact, it dominates everything else! What does that do to the balance of the design? Does the grape cluster look ok with the light coverage stitches on the fruit? Do the solid stitches on the seed pod and the tree branch look odd paired with the grapes and the fruit? What will I have to do to the bird to make it an area that will be noticed, not ignored because those sparkly grapes are present?
Stitching painted canvases from scratch is an exercise in taste and style. You not only have to come up with stitches and choose threads, you have to balance everything you do so that it makes up a harmonious whole. I don't think there are rules for this. You can't tell people if you always do X, things will always look great. Painted canvases are too varied and everyone's taste differs. I know plenty of people who never do anything but tent stitches, for example. And there are people who only do canvases they can embellish the heck out of with the newest, glitziest threads, and dozens of stitches. Your own individual style determines what type of stitching you are drawn to.
What this means is that there are only general guidelines for stitching painted canvases, which is why so many folks buy stitch guides, why so many avoid painted canvases, and why so many fall in love with a design only to leave it languishing in their stash because they don't have the nerve to start it.
For me, stitching painted canvases is equivalent to mountain climbing, sailing around the world solo, or racing cigarette boats, etc. That is why Blog is called The Chilly Hollow Needlepoint Adventure. I'm always exploring what I can do with needle and thread and how I can work with a designer's vision to create something unique that enhances the original design.
You already know that I'm playing with ways to emphasize or de-emphasize areas on Cha. After all, I used a larger version of the same stitch to make one flower advance visually while the other recedes. I am using more plies on the flowers and fewer on the leaves for the same reason. Now we are moving into another area, the focal point of the canvas, where I added beads to make the wild grapes the main part of the canvas. I have several ideas about how to give the bird's upper body equal weight to the grapes but I'll talk about those later. Right now I'd just like to point out what is happening with this canvas so you can understand what I am trying to accomplish.
The design reminds me of expensive French wallpaper with a half realistic and half stylized parrot about to land on the branch of a flowering tree to feast on fruits. The flowers remind me of magnolias but they have poppy centers, which is typical of the elements of the design. Half is realistic and half isn't. This gave me the idea of trying to make this design one that is becoming real. I hope to give Cha-Cha the feel of a fabric that is coming to life. I want the focal point of the canvas solid, while the margins are less so. The flowers are part of a drawing but the bird in the center is coming to life. We'll have to wait until I finish to see if I pull this off.
I want to repeat a link I posted yesterday to Gay Ann Rogers' website. This is one of her technique postings. In it she talks about thread weight and how important it is. I'm using thread weight on this canvas as well as stitches to making it match my vision. I hope this gives you things to think about that will help you with your canvases and give you ideas about how to proceed without worrying whether you will fail.
http://www.gayannrogers.com/site_2/Techniques_10.html
Besides, I probably am going to need advice and your critical eyes as I stitch Cha in my latest needlepoint adventure.
Today's going to be as hot and I expect we'll have more brownouts. (I'm doing my part to minimize electricity use by not running the washer or dryer or vacuum cleaner. LOL) I do hope to stitch more background and do more leaf stitches before it gets so hot that handling needle and thread with sweaty hands doesn't appeal to me.
Written by Jane/Chilly Hollow Blogging at http://chillyhollownp.blogspot.com Archived Yahoo 360 postings at http://profiles.yahoo.com/chillyhollow
Wednesday, June 23, 2010
New Jean Hilton Designs Available
Labels:
Jean Hilton,
ScottLee
 |
| Jean Hilton's ScottLee |
The news was announced on the ANG email list yesterday but I know everyone here doesn't belong to that group, so I'll repeat it.
Three new Jean Hilton designs are available, including ScottLee (above) which was a class Jean taught just before she died. None of the three designs have been charted before. You can see the designs and order the charts through Stitches From The Heart, which owns rights to Jean's charted designs.
http://stitches-heart.com/scottlee-from-jean-hiltons-designs-is-now-available/
If you want to see more of Jean's work, click on the Jean Hilton Designs link on the right side of Stitches From The Heart's main page. All of her published designs are available from this site.
Written by Jane/Chilly Hollow Blogging at http://chillyhollownp.blogspot.com Archived Yahoo 360 postings at http://profiles.yahoo.com/chillyhollow
New Postings on Stitch Guides Blog
Labels:
Cynthia Thomas,
Robin King,
Ruth Schmuff,
stitch guides
There are new postings on the Stitch Guides Blog. I've profiled Ruth Schmuff and Cynthia Thomas and given Robin King her own article separate from the one on Amy Bunger. To find everything, use the search box in the upper left hand corner. Only the latest 3-4 articles are visible on the front page.
http://chstitchguides.blogspot.com/
Written by Jane/Chilly Hollow Blogging at http://chillyhollownp.blogspot.com Archived Yahoo 360 postings at http://profiles.yahoo.com/chillyhollow
http://chstitchguides.blogspot.com/
Written by Jane/Chilly Hollow Blogging at http://chillyhollownp.blogspot.com Archived Yahoo 360 postings at http://profiles.yahoo.com/chillyhollow
Forty Years Old and More
Labels:
monthly clubs,
Needlenook of La Jolla
Needlenook of La Jolla is celebrating the shop's 40th anniversary with a 40% off sale. The discount is for painted canvases only. Trunk show canvases are 25% off (not forty) and threads are 10% off. I don't believe there is a discount on books or tools or anything else. I am not sure when the sale ends, so act fast.
http://www.needlenookoflajolla.com/
Stitches in Time Needlepoint in Housto, TX has their latest newsletter up on their website.
http://www.stitchesintimeneedlepoint.com/html/home/stitchesintimenewsletter7.pdf
A Stitch in Time in San Marino, CA has photos up on their site of their latest monthly club. They specialist in ornaments that are mounted on a stick and displayed in a painted pail. This year's club celebrates the 4th of July, so all patriots will enjoy visiting their site and seeing the finished ornaments. It looks like you can sign up for past year's Valentine's Day, Easter and Halloween ornament clubs as well. The link below also shows off their Kelly Clark Christmas ornament club for those who are looking for more traditional holiday ornaments to stitch.
http://www.needlepoint-knitting.com/stitch-clubs.htm
In other news, Janet Perry reviews the newest Gloriana thread on her blog. It's called Filomell. It's actually Au Ver a Soie silk in the beautiful overdyed palette that Gloriana specializes in.
http://www.nuts-about-needlepoint.com/filomell-from-gloriana-thread-review
Speaking of thread, Gay Ann Rogers has posted another of her technique articles on her website. It's about an issue I'm dealing with on Cha--how to choose the right weight of thread. I highly recommend you read this. The first link is the introduction on her blog. The second is the techniques page on her website. The thread weight article is number ten.
http://gayannrogers.blogspot.com/2010/06/new-techniques-column-on-my-website.html
http://www.gayannrogers.com/site_2/Techniques.html
I did stitch a little on Cha last night but not much. It was just too hot!
Written by Jane/Chilly Hollow Blogging at http://chillyhollownp.blogspot.com Archived Yahoo 360 postings at http://profiles.yahoo.com/chillyhollow
Tuesday, June 22, 2010
Market Buzz: Photos from TNNA Columbus
Thanks to Barbara Bergsten, I've learned that TNNA has updated their World of Needlepoint site with photos of their newest market promotion: Market Buzz. You can read all about Market Buzz at the following link, then look at the photos of designers and their very latest goodies.
http://www.worldofneedlepoint.com/marketbuzz.html
Thanks for mentioning this on your blog, Barbara!
Written by Jane/Chilly Hollow Blogging at http://chillyhollownp.blogspot.com Archived Yahoo 360 postings at http://profiles.yahoo.com/chillyhollow
http://www.worldofneedlepoint.com/marketbuzz.html
Thanks for mentioning this on your blog, Barbara!
Written by Jane/Chilly Hollow Blogging at http://chillyhollownp.blogspot.com Archived Yahoo 360 postings at http://profiles.yahoo.com/chillyhollow
A Leaf For Cha
Labels:
brazil series,
cha-cha,
Leigh
 |
| A Leaf Stitch for Cha? |
The stitch on the leaf is called Large Ribbons. I found it in Brenda Hart's Favorite Stitches, page 62. I used an overdyed cotton floss from Needle Necessities, just one ply, on the leaf. I'm trying to make the leaves a bit less prominent than the flower which is stitched with two plies. The flower should be more prominent, after all. I think I should work more background so that I have it next to the leaf I just stitched. I'll try out my thread ideas for the leaf and work a bit more background for tomorrow. And of course I am working away on the fruit which you haven't seen yet.
Monday, June 21, 2010
Cha's Large Full Flower is Done UPDATED
Labels:
brazil series,
cha-cha,
Leigh

I've finished the large flower in the front left corner of the Cha-Cha canvas. That's it on the left, next to some of the background wide diamonds stitch. What do you think? Do they play nice together?

On the right is the small flower for comparison purposes. Sadly, this canvas is large enough that I can't get a scan of both flowers at once for you to see how they compare. You can't really see how the full flower's stitches are larger and how that makes the full flower come forward and the partial flower recede.
I'm working on the fruit now, but I think I'll stitch one leaf near the large full flower so I have an idea whether I can continuing working wide diamonds as the background stitch. I don't want to leave the miles of background until last.
UPDATE: Glenis requested a photograph of the whole canvas instead of a scan of sections of it. I'm afraid it is very difficult to see detail but perhaps this will help.
|
| Cha-Cha as of 6/21/10 |
Written by Jane/Chilly Hollow Blogging at http://chillyhollownp.blogspot.com Archived Yahoo 360 postings at http://profiles.yahoo.com/chillyhollow
Sunday, June 20, 2010
A Bit More from TNNA
Labels:
Columbus,
Laura Perin,
laying tools,
pocket full of stitches,
purses,
SharonG,
TNNA
I have a few more postings from here and there about the Columbus, Ohio trade show. The DMC blog has two new postings. The first is all about their tapestry wool. This is a thread not easily available to me so I was eager to see needlepoint stitched with it.
http://dmc-threads.com/?p=2353
The second posting is about trends they noticed at the show.
http://dmc-threads.com/?p=2372
The trend I'm picking up on is needlepoint purses myself. Margaret's report from TNNA today shows what leather goods, including purses, are available from Stirling. I just love the new purse shape! The bronze and pewter colors don't do much for me but they are neutrals, so you can use any stitched canvas with these colors and they will harmonize.
http://cranecottage.com/stitchingblog/?p=1561
But adding stitching to a purse isn't the only purse trend I've noticed. Pocket Full of Stitches has just posted a blog entry about all the various stitching purses they carry for carrying your stitching projects and tools. I don't know it any of these are new bags, but I thought you'd like to see the huge range of totes available from just one shop.
http://pocketfullofstitches.blogspot.com/2010/06/you-can-never-have-too-many-bags.html
Do you love charted pieces, laying tools or threads? You'll be interested in what Scarlet Thread picked out at market.
http://stitchything.blogspot.com/2010/06/new-from-laura-j-perin.html
Before I forget, remember how I covered the SharonG camo bra and tap pants set all in beads? I just discovered that one of Pocket Full of Stitches' customers has done a SharonG wine glass canvas in all beads. I think even the wine cork is covered in beads! You can see it here in PFOS' customer profile.
http://pocketfullofstitches.blogspot.com/2010/06/guest-blogger-suzanne-hicks.html
Written by Jane/Chilly Hollow Blogging at http://chillyhollownp.blogspot.com Archived Yahoo 360 postings at http://profiles.yahoo.com/chillyhollow
Anchoring Ends When Stitching Light
Yesteday morning I found a question from Melinda in the Comments section. To quote her in full--"This is a beautiful canvas, Jane. Tell me how/where you are anchoring your Walsh thread so that it doesn't show under the blank areas of the background. Thanks!"
Starting and ending threads is one of those basic techniques that are hard to master. Do you use a knot? Or not? [LOL. Sorry, I had to say that!] Just how do you end off slippery threads like rayon? Is it really important to have the back side of your work look as neat as the front? Etc.
However you normally start and end threads, if you stitch part of a painted canvas with light coverage stitches to allow the painted shading to show, you will find that ending one or two plies of a thread is much different than ending off 4-6 plies. The less thread you are using, the harder it is to tie off a thread or get one started. After all, there's not much thread on the back side to anchor a new length in.
Sometimes there is a place nearby where you can start/end threads the way you normally do. Unfortunately, most of the wide diamond stitches were done before I had stitched anything else so there is no stitched area to start/stop threads in for this canvas. Even when I have more of Cha stitched there aren't going to be many areas where there is full coverage. Here is what I do with my one ply of the 5-plied JL Walsh silk/wool thread (but this applies to all the light coverage threads and stitches I'm using on this piece):
To start a thread, I tie as small a knot as I can manage in the new length of thread. Then I stitch a Locking L stitch in an area that will be covered by one of the long stitches in wide diamonds. I stitch until the thread is about 2-3 inches from running out. (If you are using a thread that unravels in the eye of the needle you might have to stop stitching with a length when there are 4-5 inches left.)
Locking L stitches are just a little stitch over one thread followed by a second stitch over one thread next door to the first. Together these two stitches make the shape of the letter L. (If I am using a really slippery thread, I might make a Z shape from three tiny stitches.) In most cases, even if you are using only one ply of silk, these tiny stitches will be hidden by the regular stitches. You just need to figure out where to put them so that the stitch will cover the Locking L. This is one reason it is smart to do some test stitching in the margin of your canvas if you haven't done the stitch before. You'll soon have a good idea where to hide the Locking L.
The reason you will want as tiny a knot as possible on the back side is that if you tie a knot that has a little tail sticking out, that little tail will start to poke itself through to the front. Once you do your starting Locking L and then stitch that first stitch or two, turn over the canvas and check the starting knot to make sure there is no tail to stick out on the front.
If you are stitching one small area instead of the whole background, try starting your stitch in the middle of the area. That also helps keep any ending thread from showing at the margin of the area you are working. This is particularly important if your thread is slippery or if it is 100% silk. Silk becomes more of an escape artist the less of it you use to stitch with.
To end a thread once you have finished a section, use the Locking L stitch again. This time, slide a stitch you've done already over with your needle tip and run the ending Locking L stitches under this thread and its neighbors. Then turn the canvas over to the back and slip the end of your thread under neighboring stitches, if any. I often slip my thread under previous stitches on the back going in one direction, then slip it under neighboring threads going in the opposite direction so that there are 2-3 inches of thread ending off on the back. Trim the end.
Even if they are light coverage stitches, one ply on the back probably won't show. However, some folks make a point of putting a piece of fabric under their canvas in finishing. If you layer your canvas over a thin fabric, it helps mask those stitches running from one area to another. Choose a fabric color similar to the background stitch if you do this or use a sparkly fabric like gold lame.
Folks who do a lot of blackwork learn to plan their stitching path to minimize any threads from the back showing on the front. For more insight on this process, read the February 2004 Stitch of the Month information Ann Strite-Kurz wrote for ANG's website. She diagrams each stitch in such a way that the working order is very clear to minimize such problems.
http://www.needlepoint.org/StitchOfTheMonth/2004/feb.php
http://www.needlepoint.org/Stitch.php
My way of starting/stopping threads is not the only way. Here is how Marj describes what Shay Pendray recommends you do to start and end threads.
http://chillyhollownp.blogspot.com/2010/02/starting-and-stopping-threads-shay-way.html
I have written on this topic before. The best explanations I can find from older blog postings are listed below. It's a complex topic and if the above confuses you, read these explanations from me for more help. Sometimes I phrase things in a better way.
http://chillyhollownp.blogspot.com/2009/12/light-coverage-stitching-imperatives.html
http://chillyhollownp.blogspot.com/2009/11/locking-l-stitch-in-close-up.html
Great question, Melinda. Thank you! Please ask if any of the above isn't clear.
Written by Jane/Chilly Hollow Blogging at http://chillyhollownp.blogspot.com Archived Yahoo 360 postings at http://profiles.yahoo.com/chillyhollow
Saturday, June 19, 2010
Cha's Flowers and Optical Illusions
Labels:
brazil series,
cha-cha,
Leigh

Of course the flowers have red-edged petals and a round center surrounded by a ring of stamens. I would have to come up with different ways to stitch those areas. I couldn't use round stitches on the edges. Well, I probably could but I didn't think that would look good. I want smooth edges to contrast with the stitch pattern on the petals. That made me think of padding the petals in perle, then overstitching the red edges with long satin stitches to give them a slightly raised look.

http://www.flickr.com/photos/peachesandolivia/3618445766/

I ended up using Brenda Hart's Ming Variation (page 17 in her Favorite Stitches book) for the partial flower's petals. These were stitched with two plies only in two shades of Needle Necessities' peach/vanilla/lemon overdyes. Once the Ming Variation stitches were done, I added a doubled strand of peach Accentuate to the empty spots between the Ming Variation stitches. The three top rows of stitches in the example above are Ming Variation.
Note that some of the petals have Ming Variation stitched running vertically and some have it running horizontally. I did this deliberately to make the petals more distinct visually. I think the enlarged photo of the partial flower will help you see how I turned the stitch.
For the larger full flower, I increased the size of Ming Variation so that the stitches are larger, then stitched the petals in the same way. Both flowers use the same threads and stitches except I used my enlarged version of Ming Variation for the full flower to make it seem to come forward. (In the stitched example on black plastic canvas above, the bottom row is the BIG Ming Variation.) The smaller scale Ming Variation on the partial flower makes it recede. It's all about optical illusion and playing with space for these flowers.
I am still stitching on the large flower but tomorrow I'm going to answer the question Melinda asked in the comments--how do I anchor my JL Walsh silk-wool when doing light coverage stitches?
Written by Jane/Chilly Hollow Blogging at http://chillyhollownp.blogspot.com Archived Yahoo 360 postings at http://profiles.yahoo.com/chillyhollow
Friday, June 18, 2010
Stitching Cha's Background (Or Not)
Labels:
brazil series,
Brenda Hart,
cha-cha,
Leigh,
wide diamond stitch

If you've been peeking over my shoulder as I stitch painted canvases for a while here at Blog, you know that I usually stitch the background of pieces first. I often am asked why. Is this the right way to stitch a painted canvas? Well, no, I don't think there is a right or wrong place to start on a canvas, but personally, I like doing the background first. It's my personal preference. I just like getting a good start on the background before I stitch the main parts of a canvas. After all, backgrounds are HUGE and stitching them seems to take forever.
Sometimes it makes sense to do the background first. Perhaps there is going to be a ton of compensation in the background. It is often easier to count across bare, unstitched canvas to get the stitches compensated correctly if you work the background first.
Other times you'll want to stitch the background later, and I think Cha-Cha is going to be one of these times. Remember the six areas on this canvas? The leaves, flowers, fruit, bird, branch and background? If I am going to use fancy stitches in at least some of these areas, they all have to harmonize. I am not sure I will know if the background stitch I've chosen (Brenda Hart's wide diamonds stitch from page 114 of her Stitches for the Millennium book) is right until I stitch a little of all the other five areas. Here is what wide diamonds looks like.
To stitch it, I've found the easiest way is to do the blue stitches on the left first (working left to right), then working right to left do the yellow stitches, then switching to work left to right again, do the red stitches in the example above. In other words, stitch the blue backbone of the stitch, then add the bottom area and finally stitch the top. These three steps make up one wide diamond. The diagram shows how the next diamond and other rows interlock.
It's a lovely stitch. I saw it on one of Brenda Hart's student's canvases and think it is beautiful. I also think it is perfect for Cha but I won't know for sure until I stitch some of all the other areas to see that the stitches I've chosen play nice together.

Here are the few rows of Wide Diamonds I've worked using one ply from the gorgeous JL Walsh overdyed silk wool in shades of pink. I turned the canvas on its side to work vertical rows instead of trying to master the horizontal stitch. If a stitch diagram doesn't make sense to you, turn the diagram and see if stitching it on its side seems more logical to you. I do this all the time. Of course I have to turn the canvas on its side, too!
Stay tuned to see if Wide Diamonds works or if I have to rip out the test rows I've done.
Written by Jane/Chilly Hollow Blogging at http://chillyhollownp.blogspot.com Archived Yahoo 360 postings at http://profiles.yahoo.com/chillyhollow
Thursday, June 17, 2010
Introducing Cha-Cha (Leigh Designs)
Labels:
brazil series,
cha-cha,
Leigh

The canvas above is from Leigh Designs' Brazil series. It is one of eight bird-fruit-flower designs on 18 count pink canvas, all named after dance styles. You can see the whole series on the Leigh website. All the designs are 12 inches square, so this is a pretty large piece.
http://www.leighdesigns.com/Grp403x.html
When Leigh and I started talking about which design I would stitch for her next, I mentioned how much I liked the colors in the Brazil series. So she sent me Cha-Cha to stitch. Eventually this canvas will be a model for her at trade shows and I will sell a stitch guide for the design through the new Chilly Hollow Stitch Guides site.
http://www.chstitchguides.blogspot.com/
As you can see, this design breaks down into six distinct areas: the bird, the flowers, the fruit, the leaves, the tree branch and the background. It is going to be a challenge to find stitches for each area that harmonize with all the others. Tomorrow I'll talk about the background stitch I choose and why I'm doing background last on this design.
For fans of Dancing with the Stars on tv, here is a video of the cha-cha that demonstrates the basic moves.
http://www.youtube.com/watch?v=2Ngz4hPC328
"Like a flower in the breeze...."
Written by Jane/Chilly Hollow Blogging at http://chillyhollownp.blogspot.com Archived Yahoo 360 postings at http://profiles.yahoo.com/chillyhollow
New Clubs, New Finishing Instructions
Labels:
about.com,
finishing,
Fireside Stitchery,
monthly clubs,
Nativity,
standup
Fireside Stitchery has just announced four new needlepoint clubs that will all start in September. The clubs include pastries (love that blueberry pie slice), Halloween bears in costume, holiday themed baskets that make up into cute 3-D display baskets, and cookie cutter ornaments. Click on the Click Here link under each photo to see all the stitched models for each club.
http://firesidestitchery.com/fs/clubs/index.cfm?fuseaction=getClubList&CategoryId=3&clubState=future
By coincidence, Cheryl Fall, the About.com needlepoint guide, has posted instructions for finishing stand up needlepoint figures on her site. They look fairly simple so if you are interested in stitching the Halloween bears and trying your own finishing, this might be a good starting point. If you are interested in stitching a Nativity, she has also posted charts for the Nativity set used to illustrate her instructions elsewhere on this site. Click on the links to go to the charts.
http://needlepoint.about.com/b/2010/06/14/finishing-instructions-for-stand-up-figures-posted.htm
Written by Jane/Chilly Hollow Blogging at http://chillyhollownp.blogspot.com Archived Yahoo 360 postings at http://profiles.yahoo.com/chillyhollow
Wednesday, June 16, 2010
Columbus Market Again UPDATED
Folks are coming home from Columbus now and still posting about the wonderful things they say there. Margaret is back from helping at the Squiggee booth and is promising a series of articles on what she saw.
http://cranecottage.com/stitchingblog/?p=1534
UPDATE: Margaret is adding specifics to the above. First, she talks about SharonG and her designs, with photos from her booth.
http://cranecottage.com/stitchingblog/?p=1528
UPDATE #2: Margaret showcases Barbara Bergsten.
http://cranecottage.com/stitchingblog/?p=1547
She also has photos in her online Photo Album from the show. Look at pages 1-3. Anything posted after the first of June is from Columbus.
http://www.flickr.com/photos/mandco/
Peggy is home now but full of stories (and photos) of the classes she took at the TNNA show. These are presented so that shop owners learn new techniques, stitches and about new threads and can pass the knowledge along to their customers. Peggy, thanks for taking the classes on our behalf--it was a huge sacrifice! [Big grin]
http://needlepointstudyhall.blogspot.com/2010/06/its-wrap-from-columbus-tnna-2010-needle.html
DMC's blog has two product summaries: one on the workhouse perle cotton (which is so useful so many places) and their newer satin floss. Each article has photos of needlepoint projects done with the featured thread.
http://dmc-threads.com/?p=2334
http://dmc-threads.com/?p=2314
I expect a little more information to trickle out over the next few days. Stay tuned for more news....
Written by Jane/Chilly Hollow Blogging at http://chillyhollownp.blogspot.com Archived Yahoo 360 postings at http://profiles.yahoo.com/chillyhollow
Announcing the Chilly Hollow Stitch Guides Blog
Labels:
blog,
news,
stitch guides
Now that most of the news from the Columbus TNNA show has stopped coming out, I have news of my own to announce. I have a new blog! It is called Chilly Hollow Stitch Guides. It lists not only my stitch guides which are for sale, but tells you where to find stitch guides for a whole range of designs from many stitch guide writers. It's not all about me, in other words. LOL
http://chstitchguides.blogspot.com/
The new blog tells you which stitch guides I have available and how to order them. I hope that other stitch guide writers will email me at sg from chnp @gmail.com with information about whose canvases they have guides for, give me contact information, prices, etc. I'll add that to the CH Stitch Guides site along with any other information I can find about which shops do free stitch guides if you buy from them, who will do custom stitch guides, etc.
The new blog is evolving. There are twenty-eight articles already. You can browse them one by one or just use the search box at the upper left hand corner to find your favorite designer or stitch guide writer. Feel free to send me information about other guides and writers if you happen to know the details.
Blog is changing also. Occasionally I rearrange the furniture, so to speak, by choosing another layout template, changing the header photo, and changing the colors of the titles and links, etc. I get bored with the old look after a while and am always looking for something that looks good but is also easy to read. Sorry to have startled you guys with a change without notice yesterday. I just had longer computer access than usual and moved things around. It's my version of rearranging the living room furniture without the heavy lifting!
Those of you with sharp eyes have already noticed the magic carpet that tops the list of blogs I maintain at the bottom of this page. Clicking on it takes you to the new stitch guide blog. There is now a tab at the top of this page that has the link, too. You can always bookmark the new site, but any time you visit the Chilly Hollow Needlepoint Adventure, you can go on to the CH Stitch Guides site. (And vice versa--the magic carpet will bring you back here once you visit if you like.)
I hope that CH Stitch Guides will be a resource for all stitchers who are interested in a specific canvas, who collect a certain stitch guide writer's work, or who are just interested in what's available. I also hope that the original blog's new look is easy to read and makes it easy to find things once you get used to it.
Written by Jane/Chilly Hollow Blogging at http://chillyhollownp.blogspot.com Archived Yahoo 360 postings at http://profiles.yahoo.com/chillyhollow
Tuesday, June 15, 2010
The Last of the New from Columbus? UPDATED
Labels:
Bristly Thistle,
Columbus,
Needle Deeva,
Robin King,
squiggee,
TNNA
By now the Columbus trade show is over and folks are dragging themselves home, tired but happy. Robin from Amy Bunger's shop sums the show up perfectly with her posting about the new designer she discovered, new threads, and hints about her next class for TNNA.
http://needlepointstudyhall.blogspot.com/2010/06/mariela-nielson-designs-and-good-times.html
As Robin mentioned above, the Columbus Heart (Needle Deeva) class she taught went very well. Here's a review from Michele of Bristly Thistle.
http://bristlythistle.blogspot.com/2010/06/columbus-heart-class-with-robin-king.html
UPDATE: And one from Colleen of Needle Works.
http://theneedleworks.typepad.com/the_needle_works/2010/06/i-am-stuck-in-columbus-so-i-my-as-well-blog-about-market.html
Speaking of Michele, she posted photos of the newest Charley Harper animal canvases which were just released. Here they are for your viewing pleasure:
http://bristlythistle.wordpress.com/2010/06/13/new-charley-harper-needlepoint-designs/
Speaking of animals, here is Gail Hendrix's newest alligator. I never knew reptiles with teeth and claws could be so cuddly!
http://squiggeedesigns.blogspot.com/2010/06/presentingdirect-from-squiggeelandgg.html
Are you curious about what stitchers are doing with DMC's new memory thread? DMC reports their booth was full of pieces done with memory thread. You can admire the creativity at work through the many photos posted on DMC's blog.
http://dmc-threads.com/?p=2283
Here is Barbara Bergsten's TNNA booth. Wish I was there!
http://createneedlepoint.typepad.com/create_needlepoint/2010/06/saturday-at-the-tnna-show.html
Barbara is interviewed on the TNNA site. It's great to learn a bit about the personalities behind the designs, especially when you like the designs as much as I like Barbara's.
http://www.worldofneedlepoint.com/featuredartist.html
Finally, Janet Perry has written a multi-part round up of the show. Here are the links.
http://www.nuts-about-needlepoint.com/tnna-round-up-part-1
http://www.nuts-about-needlepoint.com/tnna-round-up-part-2
http://www.nuts-about-needlepoint.com/tnna-round-up-part-3
http://www.nuts-about-needlepoint.com/tnna-round-up-part-4
Written by Jane/Chilly Hollow Blogging at http://chillyhollownp.blogspot.com Archived Yahoo 360 postings at http://profiles.yahoo.com/chillyhollow
June 2010 Chilly Hollow Newsletter Article
Labels:
newsletters,
purses
Recently I just mounted three finished needlepoint canvases on the front of purses I picked up on sale here and there. They all look great and it was pretty easy to do.
In one instance I put glue around the margin of the stitched canvas, then cut it out close to the stitching and glued it on the front of a purse pocket. In the other two instances I whip stitched the canvas to the front of fabric purses. Whichever way you attach the canvas, it looks great, turning a $15 cheap sale purse into something unique and special. Here are my three masterpieces:
The mermaid canvas bag (Melissa Shirley design)
http://chillyhollownp.blogspot.com/2010/05/remember-cape-cod-dogs.html
If you have trouble finding good purses on sale locally, Beth Gantz Designs offers totes in a variety of colors. Click on the Finishing header to see photos of some of their bags decorated with their stitched designs.
Needlepoint of Back Bay has two sizes of self-finishing totes that resemble the classic beach totes as well as a variety of styles of canvases that fit the tote space perfectly.
Charles Crafts distributes two sizes of bags you might be able to get through your local crafts emporium.
You can do this, too. If you are not really up to finishing a purse yourself without help, take a look at the Pischke Pocket kits. Stitched on 10 count canvas, the kits come with a cotton woven tote bag that coordinates with the design and all the threads you need to follow the included instructions and make your own Pischke Pocket bag.
http://pischkepockets.com/
UPDATE: The Stitching Sisters have a review and photos of these totes on their blog.
http://nystitchingsisters.blogspot.com/2010/06/surprise-in-mail.html
UPDATE: The Stitching Sisters have a review and photos of these totes on their blog.
http://nystitchingsisters.blogspot.com/2010/06/surprise-in-mail.html
Want something a little more complex? Julie Pischke is known for her tote canvases and carpetbags. Check out the tote canvases currently for sale. I love the Conch House tote!
And of course you can find lovely bags from Lee and Stirling, ready to insert the canvas of your choice.
Written by Jane/Chilly Hollow Blogging at http://chillyhollownp.blogspot.com Archived Yahoo 360 postings at http://profiles.yahoo.com/chillyhollow
Monday, June 14, 2010
More News and Eye Candy UPDATED
Labels:
Amy Bunger,
Melissa Shirley,
Needle Works,
Ruth Schmuff,
TNNA

If you are a Melissa Shirley fan, then you'll be thrilled that all her newest designs are up on her website now. I love the geishas (see above) and the Asian herons, but the tiny Madonna and Child ornaments are also very appealing to me. Of course the owls and the Wild Women and the bugs are wonderful, but on Melissa's website you see everything that is new, not just what caught a shop owner's eye.
http://www.melissashirleydesigns.com/gallery/?bsn=1
Ruth Schmuff is back posting even more photos of painted canvases that have caught her eye. She's not just showing off her designs, she is buying for her shop in the Baltimore suburbs. There are some great treats here. So see for yourself!
http://www.notyourgrandmothersneedlepoint.com/2010/06/good-morning_14.html
Peggy is still reporting on the items Amy Bunger and her staff are buying for her shop and for her classes. There are lots of things we haven't seen before described here in words and in pictures. Being a threadaholic, my eye was riveted by the hand painted Shimmer Ribbon Floss from Painter's Thread (Tentakulum), but there is a lot more to see here.
http://needlepointstudyhall.blogspot.com/2010/06/day-two-shopping-shopping-shopping.html
Colleen is fighting through technical difficulties and blogging about the wonderful things she's picking up for Needle Works. Shop owners--where would we be without all their hard work? Pass that woman a Shelly Tribbey Halloween cupcake! (There is another owl canvas here from a different designer. Whoever says this is the owl show was right!)
http://theneedleworks.typepad.com/the_needle_works/2010/06/i-cant-belive-it.html
UPDATE: More Colleen, with witches and their cats. (And more but I didn't want you Halloween fans to miss these.)
http://theneedleworks.typepad.com/the_needle_works/2010/06/more-of-columbus.html
Stay tuned for even more. I expect a few more postings to wrap up the newest from Columbus tomorrow. Then I'll start a new project.
Written by Jane/Chilly Hollow Blogging at http://chillyhollownp.blogspot.com Archived Yahoo 360 postings at http://profiles.yahoo.com/chillyhollow
Sunday, June 13, 2010
Columbus Photos and More UPDATED AGAIN
Labels:
Columbus,
Ruth Schmuff,
TNNA

Ruth Schmuff isn't just a shop owner, she has a line of canvases which she has plastered all over her booth at the Columbus show. She took photos for us to see on her blog. The TNNA website says there are over 900 booths and 430 exhibitors. Can you imagine being at a show that has 430 times this amount of needlework-related supplies? I know a lot of it relates to knitting, but still...!
http://www.notyourgrandmothersneedlepoint.com/2010/06/columbus-2010-is-off-and-running.html
UPDATE: Ruth has another blog post showing off the things she saw in other booths. Canvas Candy has some darling Asian folks, don't they? After I tracked down their website, I discovered that the photo Ruth took shows both the canvases and matching glass ornaments (see second link below).
http://www.notyourgrandmothersneedlepoint.com/2010/06/good-morning.html
http://jlcanvascompany.com/Asian.html
Knowing how much there is to see, you can really sympathize with the dazed look in Peggy's eyes as she attends her first TNNA show for the Amy Bunger shop. She isn't so shell-shocked that she forgot to show off some of the new DJ Design and Princess & Me canvases, though. And there were some fascinating Canvas Candy canvases that come with their own glass ornaments (photo above) and Lani mask designs that are spectacular. Not to mention a nice light/magnifer from Elizabeth Turner and four new Wild Women designs from Melissa Shirley. Is that Coco Chanel I see? And Mae West!!!? Thanks, Peggy!
http://needlepointstudyhall.blogspot.com/2010/06/day-one-walking-mile-or-two-in-peggys.html
And if that wasn't enough, check out what Needle Works saw! Do you like mermaids? Then Leigh's Waterbabies will delight you as much as they do me. Are you fascinated by the variety of nature? Melissa Shirley's little jeweled beetles might be the perfect canvas for you. If I wasn't annoyed by the Great Horned Owls who wake us up in the middle of the night, I'd be stitching an owl canvas for sure. The variety of sizes and styles of canvases featuring this magnificent bird are incredible. And of course the new Mindy pieces are astounding in their color and patterns.
http://theneedleworks.typepad.com/the_needle_works/2010/06/columbus-market-minitrunk-show.html
UPDATE: More from Needle Works
http://theneedleworks.typepad.com/the_needle_works/2010/06/ordering-from-market.html
You know, it is a good thing we are not at Market with these shops. I'm pretty sure I'd be dying from Sensory Overload right now....
Jane, reveling in the Eye Candy here in Chilly Hollow
Written by Jane/Chilly Hollow Blogging at http://chillyhollownp.blogspot.com Archived Yahoo 360 postings at http://profiles.yahoo.com/chillyhollow
Subscribe to:
Posts (Atom)
